
Wind Vane: A wind vane is a device utilized to indicate wind direction. Making a wind vane for a science project is an interesting topic. Wind vanes are widely observed in our buildings, particularly at the highest point of the structure. Wind vanes are set up so that they can rotate in response to the wind. A weather vane is another name for it. Montague, Michigan has the world’s largest working wind vane. It stands 48 feet (14.6 meters) tall and has a length of 26 feet (7.9 meters). It is shaped like an arrow with a ship on top. We will learn how to make a wind vane project in detail for your science project or home decorating purpose in this article.
Wind Vane
What is a Wind Vane? A wind vane is a device that aids in determining the direction of the wind. The wind vane has two ends: one is shaped like an arrow and rotates in the direction of the wind, while the other is wider and catches the breeze. If the wind-vane arrow is pointing to the east, the wind is blowing from the east. A wind vane is highly useful, but it is also used for decoration.
Greek astronomer Andronicus reported the first wind vane around 48 BC. The wind vane’s motif featured Triton (the Greek deity of the sea) with a wand that showed the wind direction. There are numerous types of wind vanes available nowadays. Ships, arrows, horses, and cockerels are some frequent motifs for wind vanes.
Wind Vane Project
The Wind Vane project is easy to do at home for your science exhibition. We usually pin a straw to the eraser end of a pencil to allow the wind vane to spin freely. A wind vane is often made up of a flat or arrow-shaped construction called the “vane,” which is fixed on a pivot. The vane is intended to line up with the wind’s direction, indicating where the wind is coming from. To offer a visual reference, the wind vane is frequently marked with basic directions such as North, South, East, and West. The vane rotates as the wind blows, pointing in the direction of the wind’s origin. The complete step-by-step instructions for making a wind vane are provided in the next section.
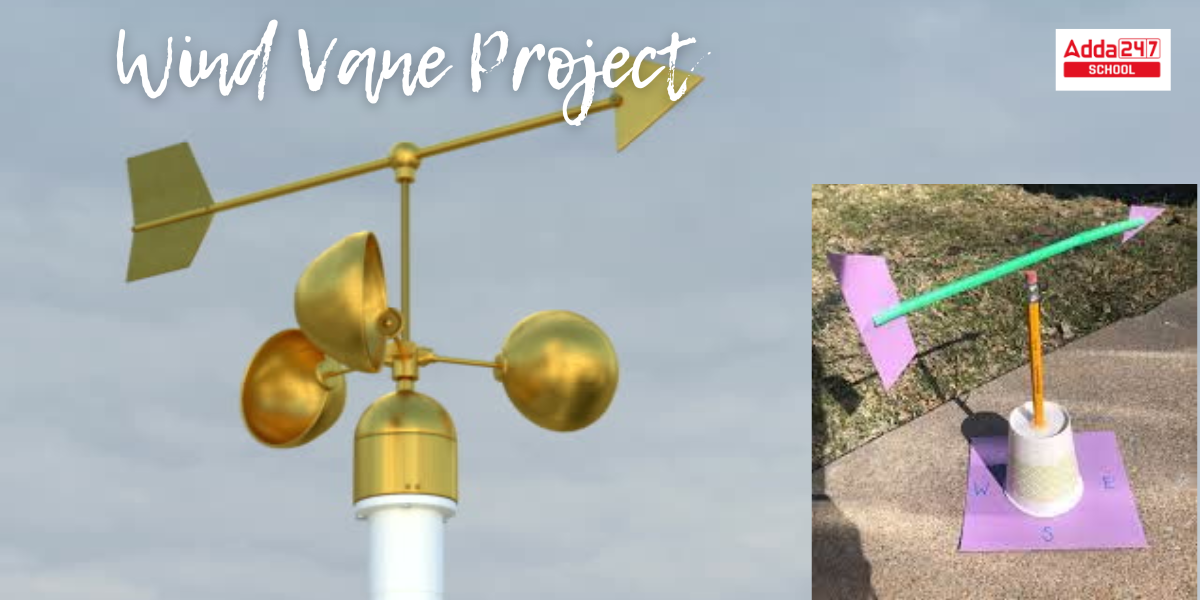
Wind Vane Diagram
Let’s have a look at how the Wind Vane model looks in the the following diagram.

Wind Vane Model Working Principle
The fundamental principle controlling the operation of a wind vane is that its design and construction must allow for free movement of the wind in order to indicate the correct wind direction. This means that wind needs to be able to circulate freely, particularly around the structure’s vertical axis. This is possible only if the wind vane’s design is unequal. Because of its asymmetry, it can point in the direction of the wind. Because it is stabilized, a wind vane can only circle on its axis.
Science Project- How to make a Wind Vane?
Wind vane making is a fantastic scientific experiment. A wind vane project can be constructed in a variety of ways.
Materials Required
- Tough paper
- a pair of scissors
- A pin
- A pencil with a top rubber
- Clay
- the drinking straw
Procedure
Step 1: At first cut a triangle with a ruler to serve as an indicator for the wind vane. This should be around 4 cm in diameter and 5 cm tall. Next, draw a square with 7 cm on each side.
Step 2: Your wind vane now has two sides: a square and a triangle. Cut identically measured openings on both sides of the drinking straw after you have both pointers ready.
Step 3: It is preferable, but not required, to maintain the lengths consistent. These slits should be around a centimeter long.
Step 4: After you’ve cut the slits, open the straw up at the top and attach the triangle on one side and the square on the other. Your structure should have the shape of an arrow. Insert a pin through the straw’s center and secure it to the rubber on the top of the pencil. A solidly constructed wind vane should be stable.
Step 5: The other end of the pencil that we normally use to write will be inserted into a block of clay to keep it stable. First, roll the clay into a ball, and then insert the pencil.
Step 6: Make a wind vane foundation by copying a compass and marking east, west, north, and south on it. Push the clay into the center of this compass-like foundation.
Step 7: Attach your structure to an additional heavy object, such as an empty container with stones or sand in it, to keep it standing and sturdy.
Observation
Your wind vane is now ready to go. If you place this wind vane on your roof it will spin and indicate the direction.
Working Wind Vane Project Explanation
The wind vane’s operation is based on the fact that it swings in the direction of the wind. This can only happen when the design of a wind vane is uneven. Because of this asymmetry, it is capable of pointing in the direction of the wind. A wind vane can only revolve on its axis because it is stabilized.
All of the directions have been written on it, so that even from a distance, an observer may discern the direction of the blowing wind. It is also located at a very high elevation on a structure so that the wind direction is not influenced by anything exterior (nearby big or heavy objects).
Things to Remember while making Wind Vane
Accurately seeing and tracking a wind vane’s model allows us to better grasp how it operates. Students should pay close attention to the following instructions to prevent creating any mistakes while making a wind vane.
- It’s important to remember that the construction functions best when the design isn’t symmetrical. This is necessary so that the lighter and shorter regions can face the direction of the wind.
- Although the shape can be asymmetrical, the weight must be equal on both sides of the vertical axis of the construction. The wind vane revolves on its axis and is allowed to spin.
- It is critical that the wind vane be labeled with the directions north, south, east, and west. This enables us to read the windvane from far away.
- The height at which the wind vane is mounted is another aspect that influences its operation. It is desirable to be put at the building’s tallest point. This prevents any other tall structure from influencing the wind’s direction and hence influencing the wind vane’s reading.
Wind Vane Uses
A wind vane is a device used to determine the direction of the wind. The following are some of the applications for a wind vane.
- A wind vane is mainly employed to gauge the direction of the wind.
- It is also used to determine wind speed.
- wind vane is used to forecast storm severity. It is used in disaster relief to shield people from high winds.
- It is also used to predict the weather.
- wind vane is also utilized to avert natural disasters and calamities.
- It is used for determining wind pressure and speed.
- In houses, it is used as a decorative element.
- In boats, a wind vane is used as a navigational aid.


 Best CUET Coaching in Noida Sector 62 | ...
 Best CUET Coaching in Preet Vihar | Adda...
 Best CUET Offline Classes in Preet Vihar...